Inventory Detail
Item lines on records that move stock, such as vendor bills, item receipts, invoices, cash sales, item fulfillments, and inventory adjustments, carry an inventory detail in NetSuite: the lot or serial numbers, bins, and inventory statuses for the line's quantity. This page explains how bulk record sheets handle it and which setup to use.
Choose Your Setup
There are two ways to work with inventory detail.
| Setup | Use it when |
|---|---|
| Without Inventory Assignment columns. NetSuite builds and adjusts the detail for you. | Your items have no lot or serial numbers, you do not choose bins yourself, and lines use the default inventory status. |
| With Inventory Assignment columns. The sheet shows each line's detail and you edit it directly. | You use lot numbers, serial numbers, bins you choose yourself, or inventory statuses other than the default, or you need to split a line across statuses. |
In short: add the Inventory Assignment columns if you use lot numbers, serial numbers, bins you choose yourself, or inventory statuses other than the default.
Without Inventory Assignment Columns
The sheet shows only the line fields (Item, Quantity, Location, and so on). NetSuite keeps the detail in step with the line.
| What you do | What happens to the detail |
|---|---|
| Add a new line | NetSuite builds a default detail: one row at the default status for the line's full quantity. |
| Change Quantity or Adjust Qty By on a line whose detail is a single row with only a status | The row follows the new quantity, up or down, and keeps its status. |
| Change Quantity on a line that has no detail | NetSuite builds a default detail. |
| Change Quantity on a line whose detail is split across statuses, or uses lot numbers, serial numbers, or bins | Rejected. Finsyte cannot resize that detail. The Quantity cell's note tells you to add the Inventory Assignment columns. |
| Change another field, such as Rate or Description | The detail is not touched. |
| Change the line's Location | NetSuite moves the detail to the new location and keeps any split. On selling records the item needs stock at the new location. |
| Change the Item and keep the Line ID | The line is saved without an inventory detail. See Work With Lines. |
| Change the Item and clear the Line ID | The line is replaced and NetSuite builds a default detail for the new item. |
Changing the Location
- Line Location: change the line's Location cell. NetSuite moves the detail.
- Body Location, on a form that shows Location on lines: lines with their own Location are not affected.
- Body Location, on a form that hides line Location (every line uses the body Location): changing the body Location alone is rejected with
Please configure the inventory detail…, even when the item has stock at the new location. To move the record, change the body Location and clear the Line ID on every item row, so each line is replaced at the new location with a new default detail.
Add the Inventory Assignment Columns
- Open the template in the Template Portal and go to Columns.
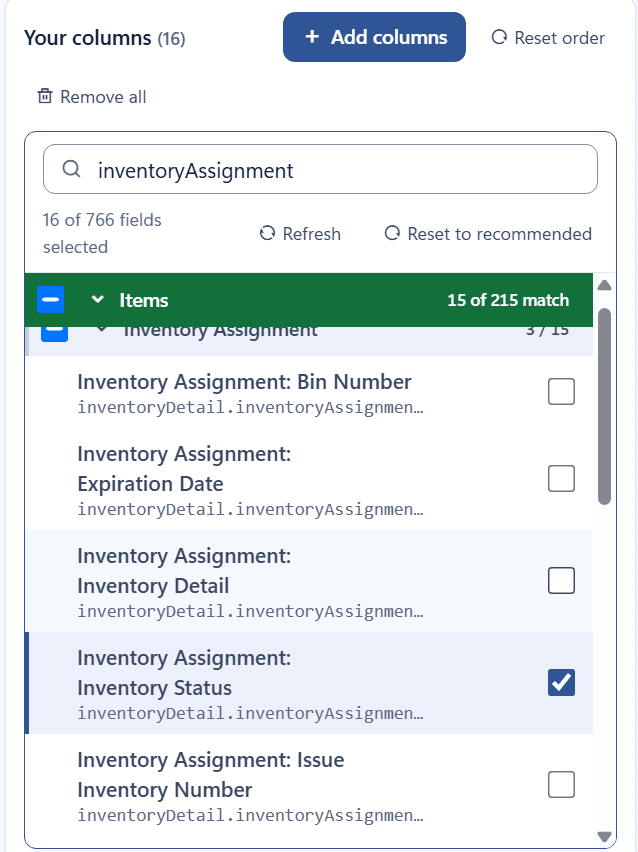
- In Add columns, find the Items group and expand its Inventory Assignment node.
- Check the fields you need (see the table below). Quantity is always needed.
- Save the template and create a new sheet from it. Existing sheets keep their old layout.
The portal adds an Inventory Assignment: ID column for you. It holds NetSuite's ID for each assignment row, the same way Items: Line ID holds each line's ID.
Which Columns You Need
| Column | Add it when | What to enter |
|---|---|---|
| Inventory Assignment: Quantity | Always. | The quantity for this row of the detail. The rows of a line must add up to the line's Quantity. |
| Inventory Assignment: Serial/Lot Number | You receive lot-numbered or serialized items: vendor bills, item receipts, and other lines that add stock. | The lot or serial number, typed. NetSuite creates it if it is new. |
| Inventory Assignment: Issue Inventory Number | You sell, ship, or remove lot-numbered or serialized items: invoices, cash sales, item fulfillments, and other lines that take stock out. | An existing lot or serial number, typed. Check the number in NetSuite. |
| Inventory Assignment: Inventory Status | Your account uses inventory statuses. | The status's internal ID, for example 1 or id_2. Status names such as Quarantine are not accepted. Downloads show the ID. |
| Inventory Assignment: Bin Number | You choose bins yourself. | The bin. |
| Inventory Assignment: Expiration Date | You receive lots with expiration dates. | The date. |
Note: Which number column to use depends on the direction of the line, not the record type alone. On an inventory adjustment, a line that adds stock uses Serial/Lot Number and a line that removes stock uses Issue Inventory Number. Add both columns if a sheet does both.
How the Detail Looks on the Sheet
Each row of a line's detail is its own sheet row.
- A line with one assignment row uses one sheet row.
- A line with three assignment rows (for example, three lots) uses three sheet rows. Its Items: Line ID is on all three rows. A download fills in the line's own cells (Item, Quantity, Rate, Location) on the first row only. Each row shows its own Inventory Assignment: ID, number, status, and quantity.
- Body fields and the Internal ID repeat on every row, as always.

Note: You can repeat the line's own cells on every row of the line, the same way body fields repeat, or leave them blank after the first row. Either works. Repeated cells must match. If they differ, Validate Sheet flags them:
<Field> differs between rows of line <id> — the first row's value is used.
Edit the Detail of an Existing Line
Download the record first. The sheet's assignment rows are the detail: what you upload replaces what NetSuite has for that line.
- Change a row's quantity or status: edit Inventory Assignment: Quantity or Inventory Status on that row. Keep its Inventory Assignment: ID.
- Add an assignment row: right-click the row number of one of the line's rows, select Copy, then right-click the row number below it and select Insert Copied Cells. On the copy, change the number, status, and quantity. Leave the copied Inventory Assignment: ID as it is. A repeated ID is read as a new assignment row.
- Remove an assignment row: delete that sheet row. Keep at least one row for the line.
- Change the line's quantity: change Quantity on the line's first row, and on any other row where it is repeated. Change the assignment quantities so they add up to the new quantity.
Upload. After the upload, the rows show the detail as NetSuite saved it, and new assignment rows show their IDs.
Important: The assignment quantities must add up to the line's Quantity. If they don't, NetSuite rejects the line and the Quantity cell's note reads:
NetSuite could not set this line's inventory detail. Check that its Inventory Assignment quantities add up to the line's Quantity…
Add a New Line With Inventory Detail
What to fill in depends on whether the item uses lot or serial numbers.
Lot-Numbered and Serialized Items
Fill in the detail in the same upload as the line.
- Add one row per lot or serial number. Serial numbers use one row each with an assignment quantity of
1. - Fill in the line cells (Item, Quantity, Rate, Location) on the first row. Repeat them on the other rows or leave them blank there; either works. On every row, fill in the number column, the assignment quantity, and the status if your account uses statuses.
- Give the line's rows the same word in Items: Line ID, for example
A. That word tells Finsyte these rows are one line. Use a different word for each new line, for exampleBfor the next one. - Leave Inventory Assignment: ID blank.
- Upload. The line is created with its detail. After the upload, the word is replaced by the line's Line ID and each row shows its assignment ID.

Note: A line with only one assignment row does not need a word. Leave its Line ID blank.
Items Without Lot or Serial Numbers
Leave the Inventory Assignment cells blank on a new line. NetSuite builds the default detail: one row at the default status for the full quantity. After the upload the row shows that assignment row's ID, status, and quantity.
Warning: NetSuite does not accept an inventory detail sent with a new line of an item that has no lot or serial numbers. If you fill in the assignment cells on such a line, the upload is rejected with
Please configure the inventory detail for this line.
Split a New Line Across Statuses
To put part of a new line in another status (for example, 3 Good and 2 Quarantine), use two uploads.
- Add the line with the Inventory Assignment cells blank and upload. The row now shows one assignment row with the default status and the full quantity.
- Lower that row's Inventory Assignment: Quantity to the first part of the split, for example
3. - Copy the whole row and Insert Copied Cells directly below it. The copy keeps the line's Line ID, so it stays on the same line.
- On the copy, set Inventory Status to the other status's ID (for example
2) and Inventory Assignment: Quantity to the rest (for example2). Leave the copied Inventory Assignment: ID as it is. - Upload. The line now has two assignment rows.
This works for a new record (create it, then split) and for a new line on an existing record.
Errors
| Message on the Quantity cell | What to do |
|---|---|
NetSuite could not set this line's inventory detail. If the item uses lot numbers, serial numbers, bins or a status other than the default, add the Inventory Assignment columns to the template. Otherwise check that the item has stock at this line's location. | Shown on sheets without the Inventory Assignment columns. Add the columns, or check stock at the line's location. |
NetSuite could not set this line's inventory detail. Check that its Inventory Assignment quantities add up to the line's Quantity. On an outgoing line, such as an invoice line, also check that the item has stock at this line's location for each status or number used. | Shown on sheets with the columns. Fix the quantities, or check stock for each status and number. |
See Upload Errors for how errors are shown.
Next step: Create Records From Another Transaction