Upload Journal Entries to NetSuite from Excel
Copy last month’s accruals and allocations, change the amounts and upload them to NetSuite as new journal entries in one batch. Each entry is checked for balance first.
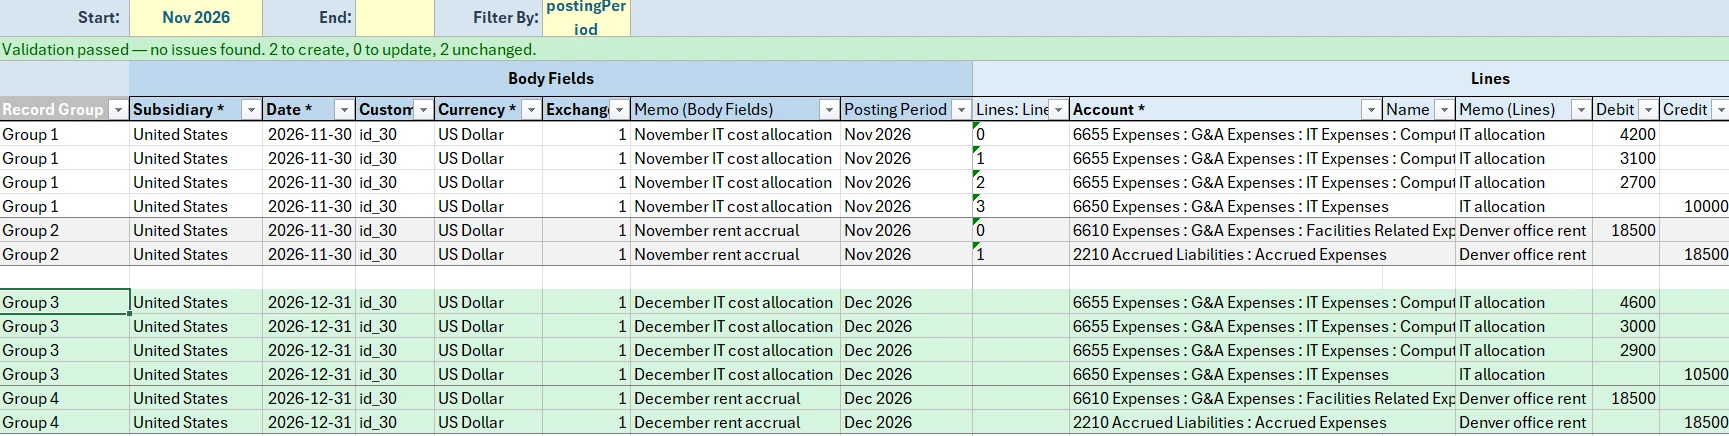
Animated walkthrough of real Excel captures with callouts. Record Edit › Bulk Records › Monthly Journal Entries opens a sheet from the template. Start is set to Nov 2026 with Filter By on postingPeriod, and Download Journal Entries brings down two November entries as six rows: a rent accrual and an IT cost allocation. The rows are copied below a blank row, Internal ID and Line ID are cleared, and the copies get new record groups. Their date, posting period and memo change to December, and the allocation amounts are typed in. Validate Sheet reports 2 to create, 0 to update and 2 unchanged. Add/Edit Journal Entries reports Upload complete, 2 created, and each copied row’s Status links to its new entry, JE719 or JE720, while November’s rows read Skipped (no changes).
The same entries every close, with new amounts
Rent and payroll accruals, prepaid amortization, shared-cost allocations: most month-end journal entries are last month’s entries with new dates and amounts, and the amounts are usually worked out in Excel already.
With a Journal Entry template, last month’s entries come down to a sheet, become this month’s with a copy and paste, and go back to NetSuite as new entries.
- Who
- Staff and senior accountants, controllers
- When
- Every month-end close
- Record type
- Journal Entry
Set up the Journal Entry template once
Build it in the Template Portal and share it, so everyone on the close team works from the same layout.
A starting point. These are the settings we used for this job. Add any columns your team works with, rename them, and set the filters and dropdowns to suit. You can edit the template whenever your needs change.
Pick the record and name the template
Template Basics in the docs- Record Type
- Journal Entry, on the Standard tab
- Custom Form
- The form your team posts journal entries with
- Visibility
- Shared, so the whole close team uses it
- Include row grouping column
- Checked. Each entry’s lines share a Record Group value, so entries stay separate however the rows are sorted.
Choose the columns
Template Columns in the docs- Recommended columns
- Keep them: Subsidiary, Date, Currency, Memo and Posting Period, and on the lines Account, Name, Memo, Department, Class and Location.
- Add
- Debit and Credit, from the Lines group.
- Remove
- Start Date and End Date, unless your entries use them.
Set how records download
Template Filters in the docs- Optional filters
- Keep
postingPeriodandtranDate, and preselectpostingPeriodin Filter By. - Default filter
- Optional. If recurring entries carry a custom checkbox or a memo prefix, filter on it so only those entries download.
- Test filters
- Every filter has to pass before the template saves.
Load the dropdown lists
Template Dropdowns in the docs- Nothing to set
- Account, Department, Class, Location, Posting Period, Subsidiary, Currency and Name come with Finsyte’s own lists already in place.
Create this month’s entries in five steps
Once the template exists, each close starts from last month’s entries.
Download last month
Open a sheet from the template, set Filter By to
postingPeriod, enter last month in Start, leave End blank and select Download. Each line comes down as its own row.Copy the entries
Paste the rows below with a blank row between. On the copies, clear Internal ID and Lines: Line ID, and give each entry a new Record Group. Every line is then created new. See use an existing record as a starting point.
Change dates and amounts
Update the date, posting period and memo on the copies, then type or paste this month’s debits and credits.
Validate the sheet
Validate Sheet totals the debits and credits on every entry and flags one that doesn’t balance, or that’s dated in a closed period, so you can fix it before uploading.
Upload
Select Add/Edit. The copies are created as new entries, and last month’s unchanged rows are skipped. Each row’s Status links to its entry in NetSuite.
November’s entries copied to December
The copies sit below the originals with new dates and amounts. Validate Sheet counts 2 to create and 2 unchanged.
Before you upload
- Deleting a row from a downloaded entry deletes that line on upload. To leave last month’s entries alone, leave their rows unchanged and they’re skipped.
- Start every edit from a download. Downloaded rows carry the Internal ID and Line IDs that keep an entry’s other lines in place.
- A blank cell on a downloaded row clears that field in NetSuite.
- Validate Sheet flags an entry dated in a closed or locked period, or a date outside its posting period, before anything is sent.
Journal entries in Bulk Records: FAQ
- QCan I upload journal entries to NetSuite from Excel?
- Yes. Build a Journal Entry template in the Template Portal, enter one row per line with Internal ID left blank, and upload. Each group of rows is created as one journal entry.
- QDoes Finsyte check that each journal entry balances?
- Yes. Validate Sheet totals the debits and credits on every entry and marks the amount cells of any entry that does not balance, with the two totals in the cell note.
- QCan I reuse last month’s entries?
- Yes. Download last month’s entries, copy the rows, clear Internal ID and Line ID on the copies, give each a new Record Group, change the dates and amounts, and upload. The originals are left unchanged.
More use cases
Reorg reclassification
Create the new segment values, move open orders, employees and items onto them in one upload, and inactivate the old values when nothing points at them.
Bank payment templates
Download every company bank account to a sheet, pick the new EFT template on the accounts that move and upload them together. The same pattern updates vendor bank details.
Customer and vendor cleanup
Download customers or vendors, change terms, credit limits and addresses with Excel’s own tools, inactivate the stale ones and upload only what changed.
Try it with your own NetSuite data
30-day free trial with every Finsyte feature included. No credit card required.