Reclassify NetSuite Departments, Classes and Locations in Bulk
Create the new departments, classes or locations, move open orders, employees and items onto them in one upload, and inactivate the old values once nothing points at them.
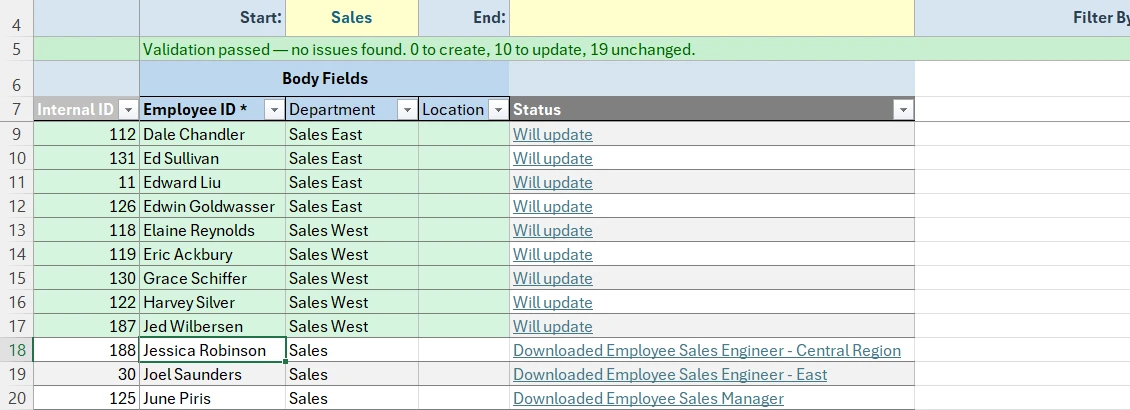
Animated walkthrough of real Excel captures with callouts. Record Edit › Bulk Records › New Departments opens a sheet where Sales East and Sales West are entered with the United States subsidiary, and Create Departments reports both created. Refresh Data › List Data adds them to the dropdowns. An Employee Departments sheet is filtered to the Sales department and Download Employees brings down 29 employees. Five move to Sales East and five to Sales West. Validate Sheet reports 10 to update and 19 unchanged, and Add/Edit Employees reports Upload complete, 10 updated, with each changed row’s Status reading Updated Employee and the rest Skipped.
A new structure, and everything that points at the old one
A department splits in two, a region is renamed, a warehouse closes, or a new class structure starts with the fiscal year. The new values are quick to add. The work is moving everything that still uses the old ones: open orders, employee defaults, item defaults.
Bulk Records does it in order from one workbook: a sheet to create the new values, a sheet per record type to move onto them, and the first sheet again to inactivate the old values.
- Who
- Controllers, FP&A, NetSuite administrators
- When
- A reorganization, usually at the start of a fiscal year
- Record types
- Department, Class, Location, Employee, items, open transactions
Three kinds of template
Each template uses a default filter, so only records on the old value download.
A starting point. These are the settings we used for this job. Add any columns your team works with, rename them, and set the filters and dropdowns to suit. You can edit the template whenever your needs change.
Pick the record and name the template
Template Basics in the docs- Segment values
- Department, Classification or Location
- Master records
- Employee, Inventory Item (any record that carries a default)
- Open transactions
- Purchase Order, and each other order type whose form shows the field
Choose the columns
Template Columns in the docs- Segment values
- Name and Subsidiaries (recommended), plus Department is Inactive
- Master records
- Start with Remove all, then add the name or ID and the department, class or location field. Employee’s recommended columns include lists such as Roles and Permissions that a reclass doesn’t need.
- Open transactions
- Document number, the body segment field, and the same field on the Items lines
- Custom segments
- Added like any other column
Set how records download
Template Filters in the docs- Default filter
- Department (or class, or location) is the old value. Use Test filter to see how many records match before you save.
- Open transactions
- Filter orders by date, and add Status as a read-only column to work on the open ones.
Load the dropdown lists
Template Dropdowns in the docs- Department, Class, Location
- Finsyte’s own lists, already set. After creating the new values, select Refresh > List Data so they appear in the dropdowns.
Reclassify in five steps
Create, move, then retire. Each step is its own upload.
Create the new values
On the Department sheet, add a row per new department with Internal ID blank, fill in Subsidiaries and select Create.
Download what uses the old value
Open a sheet from each master-record and transaction template and download. The default filter brings down only records on the old value.
Swap the value
Use Find and Replace on the department column, or a lookup from old to new when one value splits into several.
Validate and upload
Validate Sheet checks each new value against the list, then Add/Edit sends only the changed fields.
Inactivate the old values
Back on the Department sheet, download, enter
truein Department is Inactive on the old departments and upload.
Ten employees moved to new departments
They move from Sales to Sales East and Sales West. Validate Sheet counts 10 to update and 19 unchanged.
Before you upload
- Create the new values before moving anything onto them, and inactivate the old values last, once everything has moved.
- Give each new department, class or location the subsidiaries of the records moving onto it, so every record can take its new value.
- Work on transactions in open periods. Validate Sheet points out any in a closed or locked period, so you can reclass those with a journal entry.
- On transactions, update the field on the lines as well as the body. They’re separate fields.
- Select Refresh > List Data once the new values exist, and they appear in the sheet’s dropdowns.
Reclassifying in Bulk Records: FAQ
- QCan I change the department on many NetSuite transactions at once?
- Yes. Download the open transactions on the old department to a Bulk Records sheet, replace it on the body and the lines, and upload. Only the fields you changed are sent.
- QCan I create departments, classes and locations in bulk?
- Yes. Department, Classification and Location are supported record types. Add a row per new value with Internal ID blank and upload.
- QWhat about transactions in closed periods?
- Validate Sheet points them out before upload. Most teams leave history as posted and move the balances with a reclass journal entry, which a journal entry sheet uploads in one batch.
- QDoes it work with custom segments?
- Yes. Custom segments are added to templates as columns like any other field.
More use cases
Monthly journal entries
Copy last month’s accruals and allocations, change the amounts and upload them as new entries, each checked for balance first.
Bank payment templates
Download every company bank account to a sheet, pick the new EFT template on the accounts that move and upload them together. The same pattern updates vendor bank details.
Customer and vendor cleanup
Download customers or vendors, change terms, credit limits and addresses with Excel’s own tools, inactivate the stale ones and upload only what changed.
Try it with your own NetSuite data
30-day free trial with every Finsyte feature included. No credit card required.