Update NetSuite Lot Numbers in Bulk
Download the lot number records for an item, correct expiration dates or fill in custom fields such as a supplier lot number, and upload them together. Every lot is its own row.
Animated walkthrough of real Excel captures with callouts. Record Edit › Bulk Records › Lot Expiration Dates opens a sheet. Filter By is set to item with LIM002L in Start, and Download Inventory Numbers brings down its 14 lots with their expiration dates. Five lots get new dates typed as yyyy-mm-dd. Validate Sheet reports 5 to update and 9 unchanged, and Add/Edit Inventory Numbers reports Upload complete, 5 updated, with each changed row’s Status linking to its lot.
Thousands of lots, one field each
A supplier sends corrected expiry dates for a shipment. A recall needs a note on every affected lot. An audit asks for the supplier’s lot number on each lot. In food, pharmaceuticals and medical devices these updates are routine, and they arrive as a spreadsheet.
The Inventory Number record is a supported record type in Bulk Records, so those spreadsheets go straight onto a sheet and back to NetSuite.
- Who
- Inventory control, quality, regulatory teams
- When
- Supplier corrections, recalls, audits
- Record type
- Inventory Number
An Inventory Number template
One row per lot, with just the fields you update.
A starting point. These are the settings we used for this job. Add any columns your team works with, rename them, and set the filters and dropdowns to suit. You can edit the template whenever your needs change.
Pick the record and name the template
Template Basics in the docs- Record Type
- Inventory Number, on the Standard tab
- Visibility
- Shared, so inventory and quality use one template
Choose the columns
Template Columns in the docs- Remove
- The Inventory Balance columns (Item and Location). They’re recommended, but read-only stock figures.
- Body Fields
- Serial/Lot Number, Item, Expiration Date, and your custom fields
- Column settings
- Mark Serial/Lot Number and Item Read only. They identify the lot.
Set how records download
Template Filters in the docs- Optional filters
- Add
itemandexpirationDate, and preselectitem. Both pass Test filters.
Load the dropdown lists
Template Dropdowns in the docs- Item
- Finsyte’s own list, already set.
Update the lots in four steps
Match the supplier’s list to the sheet with a lookup, then upload.
Download an item’s lots
Pick the item in Start and select Download. Each lot comes down as one row.
Bring in the new values
Look up each lot in the supplier’s list and enter the new dates as
yyyy-mm-dd, or fill in the custom fields.Validate the sheet
Validate Sheet checks every date and counts the lots that will change.
Upload
Select Add/Edit. Lots you didn’t change are skipped, and each row’s Status links to its record in NetSuite.
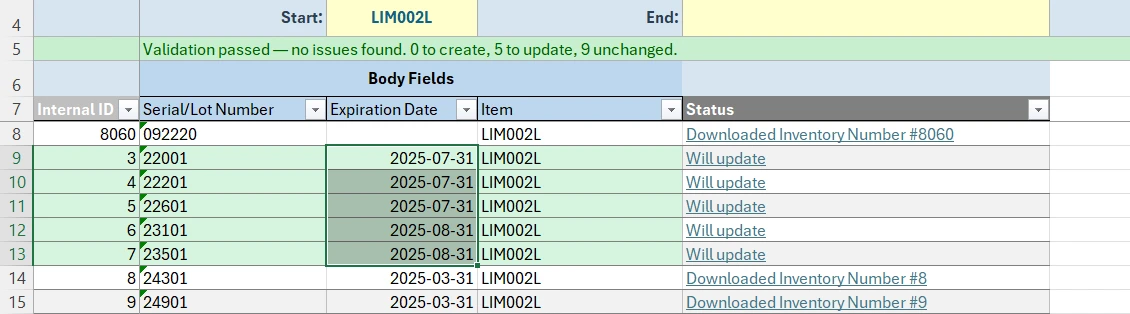
Five lots with new expiration dates
One item’s lots come down together and five get new dates. Validate Sheet counts 5 to update and 9 unchanged.
Before you upload
- New lots come in with the receipt or adjustment that brings in the stock. This sheet keeps every existing lot up to date.
- Enter dates as yyyy-mm-dd, and Validate Sheet checks each one.
- A blank cell on a downloaded row clears that field in NetSuite.
Lot numbers in Bulk Records: FAQ
- QCan I update lot number expiration dates in bulk?
- Yes. Download the Inventory Number records for an item, change the Expiration Date column and upload. Lots you didn’t change are skipped.
- QCan I update custom fields on lot numbers?
- Yes. Add the custom fields to the Inventory Number template as columns, fill them in and upload.
- QHow do I add new lot numbers?
- Enter them on the item receipt or inventory adjustment that brings the stock in, and NetSuite creates each lot. Both upload from Excel with Bulk Records too.
More use cases
Adjustments and bin moves
Add stock to NetSuite from a spreadsheet, with each new lot on its own row with its expiry and status, or move stock between bins in one upload.
Receive purchase orders
Enter the order and quantities received on each row and upload. Each receipt is created from its purchase order and stays linked to it.
Monthly journal entries
Copy last month’s accruals and allocations, change the amounts and upload them as new entries, each checked for balance first.
Try it with your own NetSuite data
30-day free trial with every Finsyte feature included. No credit card required.