Update NetSuite Item Prices and Preferred Vendors from Excel
Download items with their price levels, work out the new prices in Excel and upload them to NetSuite. Items you don’t change are skipped.
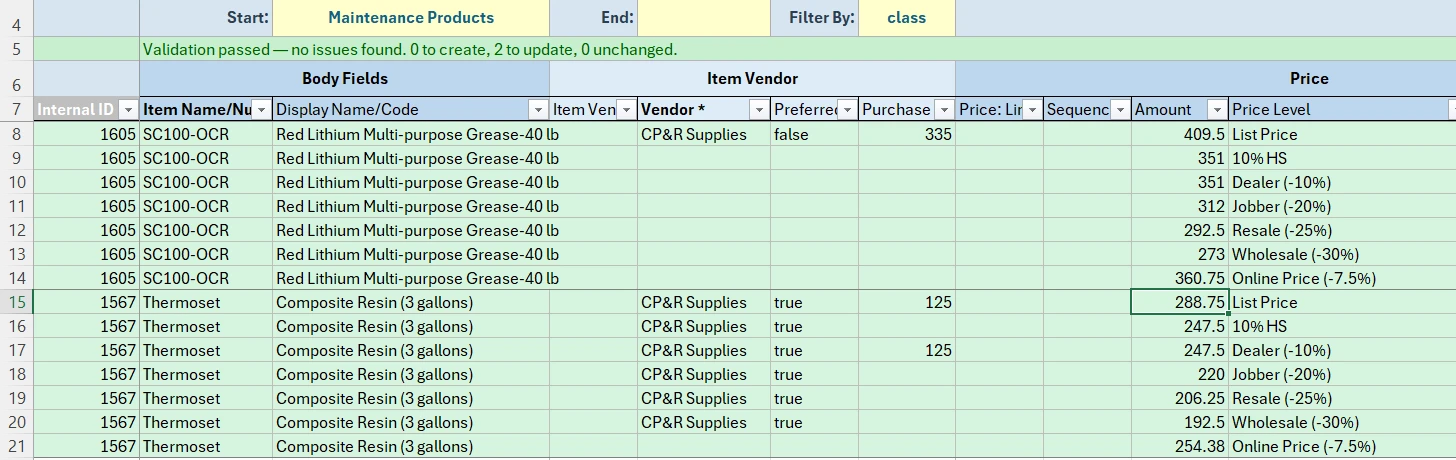
Animated walkthrough of real Excel captures with callouts. Record Edit › Bulk Records › Item Prices opens a sheet. Filter By is set to class with Maintenance Products in Start, and Download Inventory Items brings down two items with every price level and their vendor rows. The List Price of each goes up, from 390 to 409.50 and from 275 to 288.75. Validate Sheet reports 2 to update, and Add/Edit Inventory Items reports Upload complete, 2 updated.
New prices are worked out in Excel anyway
An annual price increase, a new wholesale level, a change of preferred vendor. The new numbers come from a spreadsheet: a percentage, a margin target, a price list pasted in.
A Bulk Records sheet puts each item’s current prices next to that work. Each price is a row under its item, so the new figures go straight in and upload together.
- Who
- Pricing analysts, sales operations, purchasing
- When
- Annual increases, new price levels, preferred vendor changes
- Record types
- Inventory Item, Service Sale Item and the other item types you price
An item template with its price lines
Build one template per item type you price, such as inventory items and service sale items.
A starting point. These are the settings we used for this job. Add any columns your team works with, rename them, and set the filters and dropdowns to suit. You can edit the template whenever your needs change.
Pick the record and name the template
Template Basics in the docs- Record Type
- Inventory Item (repeat for each item type)
- Template Name
- For example, “Item prices”
Choose the columns
Template Columns in the docs- Start empty
- Select Remove all. The recommended columns cover item setup (sites, bins, presentation), not prices.
- Body Fields
- Item Name/Number, Display Name, Class
- Price
- Price Level and Amount
- Item Vendor
- Vendor and Preferred
- Column settings
- Mark the body fields Read only, so only prices change.
Set how records download
Template Filters in the docs- Optional filters
- Add
itemId,class,departmentandlastModifiedDate. All four pass Test filters. - Default filter
- Optional, for example one product class, so a price review covers one line at a time.
Load the dropdown lists
Template Dropdowns in the docs- Vendor
- Finsyte’s vendor list, already set.
- Price Level
- From NetSuite (fetch a table). Select Fetch from NetSuite to load your levels.
Update prices in four steps
Keep your calculations on a second worksheet and bring in the results.
Download the items
Filter to a class or a range of items and select Download. Each price level and each vendor is a row under its item.
Work out the new prices
On a second worksheet, calculate the new figures, then paste them over the Price cells as values.
Validate the sheet
Validate Sheet checks each number and each list value, and counts the items that will change.
Upload
Select Add/Edit. Each item you changed is sent with its full price list, and the others are skipped. Each row’s Status links to its item in NetSuite.
New prices across two items
Every price level for the class is its own row, with the new amounts filled in. Validate Sheet counts 2 to update.
Before you upload
- Paste calculated prices as values. Keep the calculations on another worksheet so the sheet’s layout stays as the template built it.
- Use Excel’s filter to hide price rows you’re leaving alone. Each price row on the sheet is a level the item keeps, because a row that’s removed removes that level.
- Keep the columns where the template put them. The layout is set when the sheet is created.
- Keep every price level row of a changed item on the sheet. The item’s price list is sent whole, so a level whose row is gone is removed.
- Price levels set as a markdown follow NetSuite’s own rules when the base price changes. Download the items again after uploading to see the levels as NetSuite saved them.
- Download again before a second round of changes. After an upload the sheet shows each item’s levels as NetSuite saved them, which can add rows or change their order.
- Each item type needs its own template. A sheet holds one record type.
Item prices in Bulk Records: FAQ
- QCan I update item prices in NetSuite from Excel?
- Yes. Add the price columns to an item template, download the items, change the prices and upload. Each changed item is sent with its full price list; items you didn’t change are skipped.
- QCan I use formulas to work out the new prices?
- Yes. Work them out on another worksheet and paste the results onto the sheet as values.
- QDoes it work for service items?
- Yes. Build the same template on Service Sale Item, or on each other item type you price.
More use cases
Order line edits
Download open purchase orders with one row per line, change the department, class or rate on the lines that need it and upload. Other lines stay as they are.
Close old orders
Download open orders older than a cut-off date, mark the lines that will never be received or fulfilled as closed and upload them in one batch.
Monthly journal entries
Copy last month’s accruals and allocations, change the amounts and upload them as new entries, each checked for balance first.
Try it with your own NetSuite data
30-day free trial with every Finsyte feature included. No credit card required.